We use several elements to build the UI of an application. We create these elements using widgets in Flutter. Think menu items, buttons, text fields, scroll bars, and customized dropdowns. All of these are created using widgets.
There are some widgets that you can see (Flutter conditional show widgets), and some that you cannot (stateless widgets). If we talk about stateful widgets, these are texts, images, icons, buttons, etc. Stateless widgets, however, define how the visible ones will appear on the screen. You’ll need to be aware of both types of widgets to better understand the schema of an app’s UI.
Flutter row spacing is an important aspect of the UI design. At times, developers get confused about placing elements in rows and columns. After reading this guide, you won’t have difficulty dealing with the UI of your app.
Let’s deep dive into exploring flutter row spacing and get to know how you can build app UIs more efficiently.
What is a Row Widget in Flutter?
Flutter frameworks come with multiple widgets, among which one is the row widget. As the name suggests, it is used to display elements in a row or align them horizontally. We need to apart the elements being presented in a row to make the UI look cleaner and enhance user experience at the same time. So flutter row spacing remains helpful in achieving this desire of ours.
Flutter Row Spacing
The row widget has a couple of properties that allow you to align the elements or place them in the row according to your preference. These properties are SizedBox, Spacer, MainAxisAlignment, and Expanded. In this blog, we will seize up each of the methods to add space between row widgets in Flutter.
So, without further ado, let’s move toward the ways to add space between rows in Flutter right away.
1. SizedBox
SizedBox is by far the most flexible, easy-to-understand, and reliable method for flutter row spacing.
A SizedBox widget is simply an empty box if no constraints are provided. By default, its height and width are based on the parent widget’s size, but you can change them to suit your needs. The SizedBox widget requires you to specify the width property if you use it in the row widget. Similarly, you need to specify the height property in case you’re using SizedBox in the column widget.
👉 How to Adjust Flutter Font Size on screen size?
Here is the code example of how you use SizedBox for Flutter row spacing:
Row(
  children: const [
    Text('Hello', style: TextStyle(fontSize: 20)),
    SizedBox(width: 40),
    Text('World', style: TextStyle(fontSize: 20)),
    SizedBox(width: 20),
    Text('World', style: TextStyle(fontSize: 20)),
    SizedBox(width: 50),
    Text('World', style: TextStyle(fontSize: 20)),
  ],
),
Output:

2. MainAxisAlignment
MainAxisAlignment property can help you add predefined space between the widgets. You need to add a child widget to space the elements in a row. Interestingly, there are three child widgets in MainAxisAlignment. These are spaceBetween, spaceEvenely, and spaceAround. Let’s discuss each of them.
i) spaceBetween
The spaceBetween row’s child widget is used to specify the space between elements present inside a row widget. It automatically places your elements in the desired place determining the screen size.
Here is the example code:
Row(
  mainAxisAlignment: MainAxisAlignment.spaceBetween,
  children: const [
    Text(
      'Hello',
      style: TextStyle(fontSize: 20),
    ),
    Text(
      'World',
      style: TextStyle(fontSize: 20),
    ),
  ],
Output

ii) spaceEvenly
The spaceEvenly child widget allows you to keep equal space between the elements present in a row.
Here is the code example:
Row(
  mainAxisAlignment: MainAxisAlignment.spaceEvenly,
  children: const [
    Text(
      'Hello',
      style: TextStyle(fontSize: 20),
    ),
    Text(
      'World',
      style: TextStyle(fontSize: 20),
    ),
  ],
)
Output

iii) spaceAround
The spaceAround child widget also places even space between two elements, but also half of that space before and after the first and last child.
Here is the code example:
Row(
  mainAxisAlignment: MainAxisAlignment.spaceAround,
  children: const [
    Text(
      'Hello',
      style: TextStyle(fontSize: 20),
    ),
    Text(
      'World',
      style: TextStyle(fontSize: 20),
    ),
  ],
),
Output

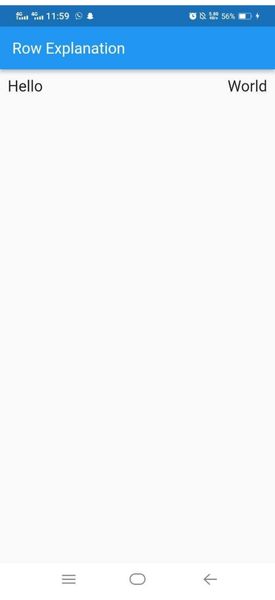
3. Spacer
Using the spacer widget, you can space the elements present in a row and can adjust the space according to your desire. If you don’t specify the space, the spacer widget takes all the space available and drags the elements to the far sides. If you want to control the space between widgets, you can use the Flutter flex property, which defines how much space you want to keep between the two widgets.
Here is the example code for using the spacer for flutter row spacing.
Row(
  children: const [
    Text('Hello', style: TextStyle(fontSize: 20)),
    Spacer(),
    Text('World', style: TextStyle(fontSize: 20)),
    Spacer(),
    Text('World', style: TextStyle(fontSize: 20)),
],
),
Output
![]()
4. Expanded Widget
Using the Expanded widget is another method of adding spaces between the row elements. As you wrap any child row inside the Expanded widget, it covers the space available on the entire screen.
Here is the example code for you to have a clear idea of how it works:
Row(
  children: const [
    Expanded(
      child: Text(
        'Hello',
        style: TextStyle(fontSize: 20),
      ),
    ),
    Text('World', style: TextStyle(fontSize: 20)),
  ],
),
Output
Conclusion
As you have read that we have explored all the possible ways for adding space between rows in Flutter. If you ask for a recommendation, we would suggest going with the mainaxisalignment one because it gives you full control over the element placement. You can leverage different child widgets of its which are space around, space-between and space evenly.
If want to hire a Flutter developer for any of your app development needs then you can definitely count on us. We are a team of skilled developers having a proven track record of building successful apps for businesses worldwide. Have a glance at our app development case studies to have a better demonstration of our work.