Skip to content
The flutter card widget is a built-in class in Flutter that is used to present content in an app distinctly. The flutter card has rounded corners and an elevation shadow that collectively forms a design box termed a “card”. In this blog, we will talk about cards in Flutter and see how can we customize them according to our requirements.
Flutter framework comes with a collection of widgets and multiple libraries, which help developers create a beautiful and engaging user interface. This results in the development of an app that benefits businesses in every way possible.
A great thing about Flutter cards is that they provide a proper distribution of content inside an application. Like, if you create a card, it will have a separate representation. Similarly, you can create multiple cards in Flutter and then compare, rearrange or filter them. This turns out to be much beneficial for enriching the user experience and overall app interactivity.
In addition, we do not need to include any graphical canvas to partition our content. The Flutter card has taken care of this for us. The Flutter card acts as a digital creative instead of incorporating graphical elements into our apps. This helps create a more interactive app and user experience.
Let’s move toward knowing what the Flutter card widget is and how can we create and customize it effectively.
So far, we will cover:
- How to Change Flutter Card Color
- How to Create Flutter Card Rounded Borders
- How to Change Flutter Card Shadow
- How to Change Card Border Color in Flutter
- How to create a card with Image and Buttons in Flutter
Without further ado, let’s jump right into the topic.
What is Flutter Card Widget?
A card in Flutter is a rounded box that usually contains text or an image inside it. It is mostly used to display or store the content of a single object. The information could be a restaurant name, address, or direction, or it could be the profile info of an individual. A Flutter card helps you create a personalized experience that improves your app’s interactivity.
The flutter card widget has some properties like shape, color, color shadow, elevation, etc. We can customize flutter cards using these properties.
Let us move on to creating a card in Flutter and later on we will customize Flutter cards.
Creating Flutter Cards
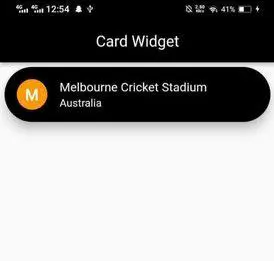
To create a card in Flutter, you just need to call the card constructor and then pass a widget as a child property to display the content and any action button inside the card. For now, we are not adding any buttons, just the content. We will add buttons and everything later in this blog. Stay with us.
Here is a sample code for creating a card in Flutter.
Card(
  child: ListTile(
    leading: CircleAvatar(
      backgroundColor: Colors.orange,
      child: Text(
        "M",
        style: TextStyle(
            color: Colors.white,
            fontWeight: FontWeight.bold,
            fontSize: 20),
      ),
    ),
    title: Text('Melbourne Cricket Stadium'),
    subtitle: Text('Australia'),
  ),
)
Let’s see what we’ve got at the start.
Result:
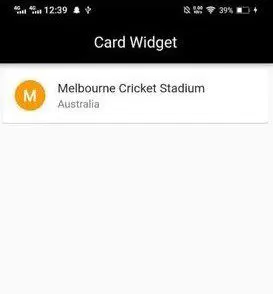
What now? Is this it? No, not really. We will need to customize the Flutter card ourselves. For now, this code will just create a default card on your app’s screen as in the screenshot above.
Now, let’s customize Flutter cards.
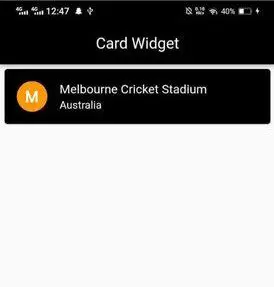
Changing Flutter Card Color
We can change the card color using the color property. As you can see in the code below:
Card(
  color: Colors.black,
  child:....,
)
Result:
Flutter Card Rounded Borders
To make the card borders round, wrap the card’s child around a Container widget. Specify the rounded rectangle border for the card. And then do the same with the colored border side for the container.
Card(
  shape: RoundedRectangleBorder(
    borderRadius: BorderRadius.circular(120.0),
  ),
  child: ...,
)
Result:
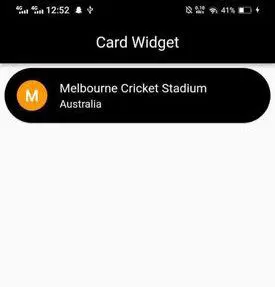
As you can see the borders of the card have been rounded.
Card Shadow in Flutter
To make the card look more prominent, we use the elevation property that adds a shadow behind the card in Flutter. And you need to pass the elevation property for this. See the code:
Card(
    elevation: 12,
    child:...
)
Result:
Change Card Shadow Color in Flutter
Now if you want to change the shadow color then you need to use shadowColor property. Here is the code:
Card(
  shadowColor: Colors.purple,
  elevation: 12,
  child: ...,
)
Result:

As you can see, the shadow color has been changed to purple. Not a big deal for you now, isn’t it? 😉
Create Custom Card with Image and Buttons in Flutter
Here is the final form of the Flutter card with customized shadow, border, and colors as well.
Card(
  elevation: 12,
  shape: RoundedRectangleBorder(
    borderRadius: BorderRadius.circular(20.0),
  ),
  color: Colors.black,
  child: Column(
    children: [
      ClipRRect(
        borderRadius: const BorderRadius.only(
          topRight: Radius.circular(20),
          topLeft: Radius.circular(20),
        ),
        child: Image.asset(
          'assets/images/melbourne.jpg',
          height: 200,
          fit: BoxFit.cover,
          width: double.infinity,
        ),
      ),
      const ListTile(
        title: Text(
          'Melbourne Cricket Stadium',
          style: TextStyle(
            color: Colors.white,
          ),
        ),
        subtitle: Text(
          'Australia',
          style: TextStyle(
            color: Colors.grey,
          ),
        ),
      ),
      Padding(
          padding:
              EdgeInsets.symmetric(horizontal: 20, vertical: 10),
          child: Row(
            children: [
              Expanded(
                child: TextButton(
                  style: TextButton.styleFrom(
                      backgroundColor: Colors.white),
                  onPressed: () {},
                  child: const Text(
                    "Edit",
                    style: TextStyle(
                      color: Colors.black,
                      fontSize: 20,
                      fontWeight: FontWeight.w300,
                    ),
                  ),
                ),
              ),
              SizedBox(
                width: 20,
              ),
              Expanded(
                child: TextButton(
                  style: TextButton.styleFrom(
                      backgroundColor: Colors.red),
                  onPressed: () {},
                  child: const Text(
                    "Delete",
                    style: TextStyle(
                      color: Colors.white,
                      fontSize: 20,
                      fontWeight: FontWeight.w300,
                    ),
                  ),
                ),
              ),
            ],
          ))
    ],
  ),
),
Final Form:
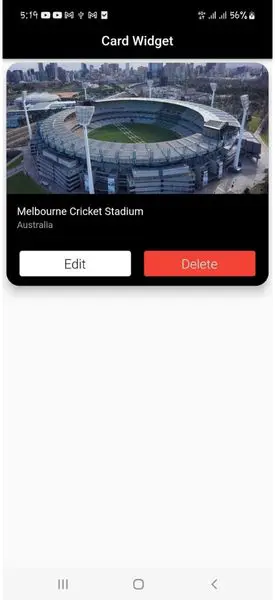
Here is the final form of the card with the image and button in Flutter. You can use the code and make the changes yourself to practice creating cards in Flutter.
Conclusion
In this blog, we have briefly discussed and learned about creating custom cards in Flutter. We have also learned how to create a card with an image and button in Flutter. Moreover, changing the Flutter card color and creating a rounded border won’t be an issue for you now.
In the end, we have provided you with the complete code for creating a card in Flutter. Use it and make changes according to your needs and enjoy enriching the user experiences. We continuously share such valuable information about Flutter app development. Just head over to our blog and you’ll find plenty of guides and information related to Flutter app development services.
If you still have any questions, please feel free to ask in the comments section. Our team of highly experienced flutter developers would love to assist you in any way possible.
Lastly, if you have a business idea and want to transform it into an app then you can hire flutter developers. We have a team of skilled Flutter developers entitled with open source contributors delivering top-notch tech solutions to businesses worldwide. Feel free to book a free discovery call with a Flutter developer today.