Flutter app development
You might have heard of state management in Flutter. This allows the UI to be rebuilt based on the app’s current state. Flutter Provider helps you manage and share data in your Flutter app. It’s a state management solution offered by the Flutter framework, making keeping your app’s data in sync easy.
With Flutter Provider, you can store and retrieve data, update it in real time, and access it from anywhere in your app. Overall, Flutter Provider simplifies data management and streamlines the development process.
In this blog, we will introduce and explain the Flutter Provider package and its role in Flutter app development. The post will provide an overview of what Flutter Provider is, how it works, and why it’s important for managing state in Flutter applications. The post will also guide readers through implementing Flutter Provider in a Flutter app, including step-by-step instructions and Flutter provider examples.
So, hold the reins tight, and let’s jump right into the blog. 😉
What is Flutter Provider?
Flutter Provider is a state management solution for Flutter applications. It provides a simple way to manage the application state and share it across multiple widgets, making it easy to access the data where it’s needed. You store the data in a central location called the provider and access it from anywhere in your app. Whenever the data changes, the provider updates it, keeping your app’s data consistent and up-to-date.
The Provider package is based on the concept of Inherited Widgets and provides a way to propagate data changes throughout the widget tree. It uses a reactive programming approach and allows developers to listen to changes in the state and automatically rebuild parts of the UI that depend on that state. This way, the state management in Flutter is done effectively.
Let’s create a Flutter provider and see how to use it within your application.
How to Use a Provider Package Flutter?
To create a provider, we must register it and then get that provider’s instance. After that, we can also get that provider’s instance on any other page. Let’s do this practically. 😉
As we create a counter-provider, we must display the value of the count defined in the CounterProvider. For that, we use the text widget and define the parameters like TextStyle, font size, and fontWeight.
As you can see, the code here:
                Text(
          	'You have pushed the button ${provider.count.toString()} times',
          	style: const TextStyle(
            	      fontSize: 20,
            	      fontWeight: FontWeight.w500,
          	),
        	),
The next step is to call the increment function defined in the Counter provider.
See the code:
      floatingActionButton: FloatingActionButton(
    	onPressed: provider.increment,
    	child: const Icon(Icons.add),
  	),
At times, we might need to get the same state of a provider on more than one page. For that, we call the context of that provider on any page we want to. You can see this in the code below.
final provider = Provider.of<CounterProvider>(context);
As we displayed the value of the count on the first page, we will need to do that for the second page as well. Here is the code:
Text(
      	'You have pushed the button ${provider.count.toString()} times',
      	style: const TextStyle(
        	fontSize: 20,
        	fontWeight: FontWeight.w500,
      	),
    	),
Now, here comes the last step, which is defining the provider. We define the attributes and functions according to the requirements. In our case, we specify the count to start from 0 and call the increment counter using ‘count++’.
class CounterProvider extends ChangeNotifier {
  CounterProvider();
  var _count = 0;
  int get count => _count;
  void increment() {
	_count++;
	notifyListeners();
  }
}
Output


As you can see in the above screenshots, the counter shows the exact number of times you tap. The same state appears on the second page as we get it fetched there.
I hope that you’ve understood how the provider works. Now let’s get into more details
Related post: Best State Management Packages for Flutter
Importance of State Management in Flutter App Development
State management is crucial in Flutter app development because it helps you organize and sync your app’s data. It ensures that the data you store in one part of your app is accessible and up-to-date in other parts of the app as well. Without proper state management, your app’s data could become difficult to manage, leading to bugs and other issues. State management techniques like Flutter Provider ensure your app’s data is consistent, organized, and easy to work with.
How does Flutter Provider compare to other state management solutions in Flutter?
Flutter Provider is one of many state management options for Flutter. Developers like it because it’s easy to use and an efficient way of state management in Flutter. Other options include BLoC, ScopedModel, and Redux, each with its own strengths. Flutter Provider stands out for being simple and flexible enough to handle complex data structures.
What are the benefits of using Flutter Provider?
Flutter Provider has several benefits to use within app development. First, it’s part of the Flutter framework, so it’s easy to add to any project. Second, it’s lightweight, fast, and simple, making it a good choice for small to medium projects. And third, it’s flexible enough to handle complex data, making it a great choice for more complex projects. Provider flutter can keep your app’s data organized, consistent, and manageable, leading to fewer bugs and a more efficient development process.
A Step-by-step Process to Implement Flutter Provider in a Flutter App
Here’s a step-by-step guide on how to implement Flutter Provider in a Flutter app:
Step 1: Add the provider package to your pubspec.yaml file.
Step 2: Create a new dart file to store your data (e.g. data.dart).
Step 3: In the data file, create a class to store your data and extend it from ChangeNotifier.
Step 4: In your main.dart file, wrap your entire app with a ChangeNotifierProvider.
Step 5: Access the data from your provider using the Consumer widget.
Step 6: Update the data by calling notifyListeners() on your provider.
Finally, you are good to go.
What is the difference between ChangeNotifierProvider and Consumer widgets?
The ChangeNotifierProvider is the main widget you use to store your data. It’s responsible for holding your data and updating it whenever it changes. The Consumer widget is used to access the data from your provider. You wrap your widgets with the Consumer widget to access the data and update the UI whenever the data changes.
The ChangeNotifierProvider and Consumer widgets are essential components in using Flutter Provider for state management.
ChangeNotifierProvider Flutter
This is the main widget you use to store your data. You wrap your entire app or a specific portion of your app with this widget. You pass your data class to the ChangeNotifierProvider widget, and it will hold and manage the data for you. Whenever the data changes, you call notifyListeners() on the provider, and it will automatically update the data and notify all widgets that depend on it.
Consumer Widget in Flutter
The Consumer widget is used to access the data from the ChangeNotifierProvider. You wrap your widgets that need access to the data with the Consumer widget, and it will automatically rebuild the widgets whenever the data changes. The Consumer widget takes a builder function as an argument, which you use to access the data and build your UI.
Using the ChangeNotifierProvider and Consumer widgets, you can easily manage and share data in your Flutter app, ensuring that your data stays up-to-date and your UI always reflects the latest data.
You might want to read: How to Fix Flutter setState isn’t defined.
MultiProvider Flutter: Handling Multiple Providers in Flutter
While building apps, you might need to use multiple providers to manage different parts of your state. You can handle multiple providers by nesting them together like any other widget.
Here is an example of multiple providers.
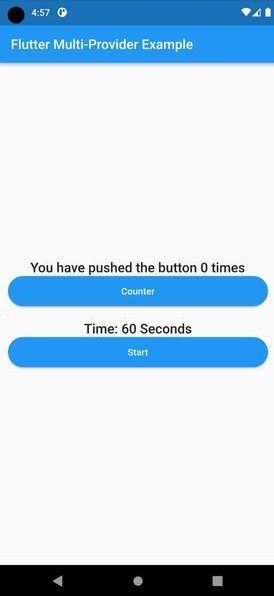
For example, if you have two providers, one for counting the number of times, you tap a button and another for managing a 60 seconds timer countdown.
return MultiProvider(
  	providers: [
    	ChangeNotifierProvider(create: (_) => CounterProvider()),
    	ChangeNotifierProvider(create: (_) => SecondProvider()),
  	],
  	child: MaterialApp(
    	debugShowCheckedModeBanner: false,
    	title: 'Provider',
    	theme: ThemeData(primarySwatch: Colors.blue),
    	home: const MyHomePage(),
  	),
	);
Here, we wrapped the MaterialApp with MultiProvider and added the list of providers in the MultiProvider class.
Now what we have to do is to define our provider class. We use the isActive boolean getter to check whether the timer is active.
See the code:
class SecondProvider extends ChangeNotifier {
  var countdown = 60;
  Timer? _timer;
  bool get isActive => _timer?.isActive ?? false;
  void startCountdown() {
	_timer = Timer.periodic(const Duration(seconds: 1), (_) {
  	if (countdown == 0) {
    	_timer?.cancel();
    	notifyListeners();
    	return;
  	}
  	countdown--;
  	notifyListeners();
	});
  }
  void stop() {
	_timer?.cancel();
	notifyListeners();
  }
}
class CounterProvider extends ChangeNotifier {
  CounterProvider();
  var _count = 0;
  int get count => _count;
  void increment() {
	_count++;
	notifyListeners();
  }
}
To access the provider objects, use the following code:
final provider = Provider.of<CounterProvider>(context);
final secondProvider = Provider.of<SecondProvider>(context);
Now we need to display the value of the counter provider. For this, we will need to call the increment function. See here:
        Text(
            	'You have pushed the button ${provider.count.toString()} times',
            	style: const TextStyle(
              	fontSize: 20,
              	fontWeight: FontWeight.w500,
            	),
        ),
              ElevatedButton(
            	style: ElevatedButton.styleFrom(
              	minimumSize: const Size.fromHeight(45),
              	shape: RoundedRectangleBorder(
                	borderRadius: BorderRadius.circular(25),
              	),
            	),
            	onPressed: provider.increment,
            	child: const Text('Counter'),
          	),
Now let’s move toward displaying the value of the countdown provider. We display the value of the counter provider in this way:
              Text(
            	'Time: ${secondProvider.countdown.toString()} Seconds',
            	style: const TextStyle(
              	fontSize: 20,
              	fontWeight: FontWeight.w500,
            	),
          	)
See the code below if you want to know how the countdown starts and stops on tapping.
	ElevatedButton(
            	style: ElevatedButton.styleFrom(
              	minimumSize: const Size.fromHeight(45),
              	shape: RoundedRectangleBorder(
                	borderRadius: BorderRadius.circular(25),
              	),
            	),
            	onPressed: secondProvider.isActive
                	? secondProvider.stop
                	: secondProvider.startCountdown,
            	child: Text(secondProvider.isActive ? 'Stop' : 'Start'),
          	),
Output


Conclusion
We hope this in-depth guide to Flutter provider has helped you understand what it can do for you regarding state management. It’s easy to set up and use and provides several advantages over other state management solutions. Using a provider, developers can enjoy a single source of truth and real-time updates and easily manage complex data structures.
If you still have any questions or suggestions, please comment below. Moreover, if you’re looking for a Flutter App Development Company to help you build a substantial app for your business, please get in touch with us. Our team has highly skilled Flutter developers for hire, striving to provide state-of-the-art tech solutions to businesses worldwide.


