Flutter phone authentication is one of the most important features while building any mobile, web, or desktop application. It gives users a personalized experience and helps them leverage easy login methods. Additionally, phone authentication is a secure method of verifying a user, as only you will receive access information while logging in. You immediately get informed about any unknown login attempts being carried out if you authenticate as a user using your phone number.
Interestingly, Firebase provides user authentication services to developers. Owing to this, logging in using the phone number doesn’t remain a big deal. We will discuss in detail how to authenticate phone number in any Flutter application.
To authenticate phone number with our mobile app, we first need to integrate firebase into our flutter application. If you don’t know how to integrate Flutter with firebase, here is our quick guide to authenticating Firebase with the Flutter application. This guide is surely going to be helpful to you.
Let us move on to further steps of authenticating phone numbers to a Flutter application.
Related Post – Flutter CSV field Matching
Let’s Get Started
It could be a Google account, Twitter account, Facebook, or phone number. In this blog, we will be discussing how to authenticate users through mobile phones in a Flutter application.
After that you have integrated Firebase with your Flutter app, it’s time to enable the phone sign-in from the firebase console. To enable phone authentication; go to the Firebase console, open the Authentication tab from the left panel, click the setup sign-up method and then enable the phone verification. You’re all set. For enabling the phone auth, just. 😛
Before moving to the next step, I want you to make sure that you have added the Firebase core plugin and Firebase Authentication plugin to the pubspec.yaml file. These are important to add.
Dependencies:
firebase_auth 4.1.5
The next step is to verify the phone number that the user wants to log in with. Here is how you do it.
Verify Phone Number in Flutter App
Firebase has the verifyPhoneNumber function that uses multiple properties to authenticate a phone number in any Flutter app. These properties are phoneNumber, timeout, verificationCompleted, verificationFailed, codeSent, codeAutoRetrievalTimeout. Now let’s take a closer look at each element involved in verifying phone number.
FirebaseAuth.instance: Provide access to Firebase Auth using the Firebase app installed on your platform when you installed FlutterFire.
phoneNumber: the phone number that you will use to verify the user.
timeout: the time after which the code sent to your phone number will expire.
verificationCompleted: this property is called when you put in the right OTP.
verificationFailed: it’s also a callback which is called when you enter the wrong OTP or an invalid phone number.
codeSent: this function is called when the OTP has been sent to the given phone number.
codeAutoRetrievalTimeout: It is the cooldown time that limits you to request the new code for a few moments.
Here is the code to verify the phone number in the Flutter app.
String get _number => widget.phoneNumber;
  final _auth = FirebaseAuth.instance;
  late String verificationCode = '';
  final _otpController = TextEditingController();
///Verify Phone Number Function
 _auth.verifyPhoneNumber(
      phoneNumber: _number,
      timeout: const Duration(seconds: 120),
      verificationCompleted: (credentials) async {
        await _auth.signInWithCredential(credentials);
      },
      verificationFailed: (exception) {},
      codeSent: (verificationID, [forceCodeResend]) {
        verificationCode = verificationID;
      },
      codeAutoRetrievalTimeout: (verificationID) {
        verificationCode = verificationID;
        _otpController.text = verificationID;
      },
    );
Now that you have gone through the basic functions that are going to be used to authenticate phone number in Flutter, let’s discover the UI part.
Here is the code to create the flutter phone authentication page.
import 'package:flutter/material.dart';
import 'package:mobile_otp_auth/src/components/auth/otp_page.dart';
class PhoneAuthPage extends StatefulWidget {
  const PhoneAuthPage({Key? key}) : super(key: key);
  @override
  State<PhoneAuthPage> createState() => _PhoneAuthPageState();
}
class _PhoneAuthPageState extends State<PhoneAuthPage> {
  final _numberController = TextEditingController();
  @override
  Widget build(BuildContext context) {
    return Scaffold(
      body: Padding(
        padding: const EdgeInsets.symmetric(horizontal: 12),
        child: Column(
          mainAxisAlignment: MainAxisAlignment.center,
          crossAxisAlignment: CrossAxisAlignment.center,
          children: [
            const FlutterLogo(size: 100),
            Padding(
              padding: const EdgeInsets.symmetric(vertical: 20),
              child: TextFormField(
                controller: _numberController,
                keyboardType: TextInputType.phone,
                decoration: const InputDecoration(
                  hintText: '+923123456789',
                  labelText: 'Enter Phone Number',
                  border: OutlineInputBorder(),
                  enabledBorder: OutlineInputBorder(),
                  focusedBorder: OutlineInputBorder(),
                ),
              ),
            ),
            ElevatedButton(
              style: ElevatedButton.styleFrom(
                minimumSize: const Size.fromHeight(60),
                shape: RoundedRectangleBorder(
                  borderRadius: BorderRadius.circular(56),
                ),
              ),
              onPressed: () {
                Navigator.of(context).push(
                  MaterialPageRoute(
                    builder: (_) => OTPPage(
                      phoneNumber: _numberController.text,
                    ),
                  ),
                );
              },
              child: const Text('Sign in'),
            )
          ],
        ),
      ),
    );
  }
}
Output:
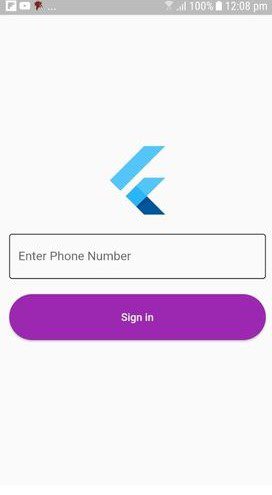
Let’s move to the sign-in part.
Here is the code that will allow you to get the OTP on your phone to sign in.
Future<void> _loginWithCredentials(String otp) async {
    await _auth.signInWithCredential(PhoneAuthProvider.credential(
      verificationId: verificationCode,
      smsCode: otp,
    ));
  }
Here is the code to create the OTP page.
import 'package:firebase_auth/firebase_auth.dart';
import 'package:flutter/material.dart';
import 'package:mobile_otp_auth/src/components/home/home_page.dart';
class OTPPage extends StatefulWidget {
  const OTPPage({Key? key, required this.phoneNumber}) : super(key: key);
  final String phoneNumber;
  @override
  State<OTPPage> createState() => _OTPPageState();
}
class _OTPPageState extends State<OTPPage> {
  String get _number => widget.phoneNumber;
  final _auth = FirebaseAuth.instance;
  late String verificationCode = '';
  final _otpController = TextEditingController();
  @override
  void initState() {
    super.initState();
    _auth.verifyPhoneNumber(
      phoneNumber: _number,
      timeout: const Duration(seconds: 120),
      verificationCompleted: (credentials) async {
        await _auth.signInWithCredential(credentials);
      },
      verificationFailed: (exception) {},
      codeSent: (verificationID, [forceCodeResend]) {
        verificationCode = verificationID;
      },
      codeAutoRetrievalTimeout: (verificationID) {
        verificationCode = verificationID;
        _otpController.text = verificationID;
      },
    );
  }
  Future<void> _loginWithCredentials(String otp) async {
    await _auth.signInWithCredential(PhoneAuthProvider.credential(
      verificationId: verificationCode,
      smsCode: otp,
    ));
  }
 @override
  Widget build(BuildContext context) {
    return Scaffold(
      appBar: AppBar(title: const Text('OTP Page')),
      body: Padding(
        padding: const EdgeInsets.symmetric(horizontal: 12),
        child: Column(
          mainAxisAlignment: MainAxisAlignment.center,
          crossAxisAlignment: CrossAxisAlignment.center,
          children: [
            TextFormField(
              controller: _otpController,
              keyboardType: TextInputType.number,
              maxLength: 6,
              decoration: const InputDecoration(
                counterText: '',
                hintText: '12345',
                labelText: 'Enter OTP',
                border: OutlineInputBorder(),
                enabledBorder: OutlineInputBorder(),
                focusedBorder: OutlineInputBorder(),
              ),
            ),
            const SizedBox(height: 20),
            ElevatedButton(
              style: ElevatedButton.styleFrom(
                minimumSize: const Size.fromHeight(60),
                shape: RoundedRectangleBorder(
                  borderRadius: BorderRadius.circular(56),
                ),
              ),
              onPressed: () async {
                try {
                  showDialog(
                    context: context,
                    builder: (_) {
                      return AlertDialog(
                        content: Row(children: const [
                          CircularProgressIndicator(),
                          SizedBox(width: 12),
                          Text('Signing In'),
                        ]),
                      );
                    },
                  );
                  await _loginWithCredentials(_otpController.text);
                  if (!mounted) return;
                  Navigator.of(context).push(
                    MaterialPageRoute(builder: (_) => const HomePage()),
                  );
                } catch (_) {
                  print('Exception - $_');
                }
              },
 child: const Text('Sign in'),
            )
          ],
        ),
      ),
    );
  }
}
Output:
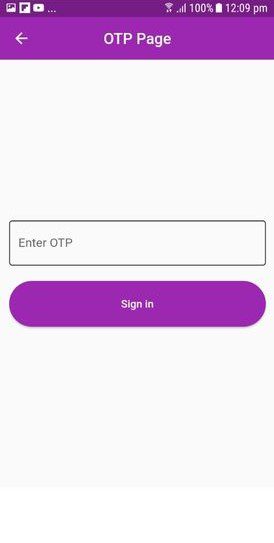
Finally, if you enter the valid OPT, you will be successfully logged in to the app through your mobile phone.
Here is the code to display that login success message.
import 'package:flutter/material.dart';
class HomePage extends StatelessWidget {
  const HomePage({Key? key}) : super(key: key);
  @override
  Widget build(BuildContext context) {
    return Scaffold(
      appBar: AppBar(title: const Text('Home')),
      body: const Center(
        child: Text('Login Successfully'),
      ),
    );
  }
}
Output:

Conclusion
This is it for the quick guide to Flutter phone authentication. We hope that this article would be helpful to you. We would love to hear any suggestions or queries if you have any.
If you have an app idea and want to hire flutter developers, then you can count on us.