While building Flutter apps, you get to use several plugins. Each plugin has its respective features to offer inside the app. Plugins allow you to communicate with platform-specific code to access the features of that platform. Interestingly, developers from the Flutter community also contribute to each other and share plugins with each other. In this blog, you will get to know how to use webview in Flutter.
There are several features that we need to add to any app to make it more useful. You have to keep in mind that adding more and more features to an app doesn’t make it useful. Your app can face a massive bounce rate if you stuff it with different features that weren’t necessary.
Adding webview to a flutter app is useful because it gives control over the user experience and the navigation with the help of delegated objects. A webview is only useful when you want increased and advanced control over your app’s UI. These advanced controls help you to leverage different web pages in a personalized environment.
Keep staying with us because we will provide you with a Flutter webview source code at the end of this blog. The code will lead you toward creating a webview in Flutter apps development company for Android and iOS both.
Let’s move towards knowing what a webview is in Flutter, how to use it, and some examples of it.
What is WebView in Flutter?
Webview in a Flutter app is a platform-native view that allows you to integrate website content into your app’s UI. It simply adds the website pages to your app which (when opened) displays the web page over the app’s interface. As long as you surf that website, you can close it with just a click and get back to the app’s UI right away.
Web views present HTML, CSS, and JavaScript content alongside the native view of your app. There are several things that you need to learn to add a webview in Flutter apps. This includes handling the flow while receiving the callbacks from webview to the native app layer and vice versa. Interestingly, webview automatically converts any telephone numbers to phone links that are available on the web content. So when a user taps on the phone number, the app launches the phone dialer and dials the number.
Let’s move towards creating a web view in Flutter apps.
How to add a webview in Flutter app for both Android and iOS?
Creating a webview in Flutter apps will not seem difficult to you after getting an idea from this blog post. Interestingly, the code is cross-platform so you can reuse it for iOS and Android both. The code given
Here is the Flutter webview source code for you so you can easily create a web view in apps.
Change the URL in the final _url to embed the web view of your own website.
import 'dart:async';
import 'dart:io';
import 'package:connectivity/connectivity.dart';
import 'package:flutter/foundation.dart';
import 'package:flutter/gestures.dart';
import 'package:flutter/material.dart';
import 'package:webview_flutter/webview_flutter.dart';
void main() {
  runApp(const MyApp());
}
class MyApp extends StatelessWidget {
  const MyApp({Key? key}) : super(key: key);
  @override
  Widget build(BuildContext context) {
    return MaterialApp(
      title: 'Title',
      theme: ThemeData(
        primaryColor: const Color(0xffFFAA02),
        visualDensity: VisualDensity.adaptivePlatformDensity,
      ),
      home: HomePage(),
    );
  }
}
class _HomePageState extends State<HomePage> {
  bool _isInternet = false;
  Connectivity? _connectivity;
  StreamSubscription? _subscription;
  WebViewController? _webViewController;
  final _controller = Completer<WebViewController>();
  final _url = 'https://sparkosol.com';
  final Set<Factory<OneSequenceGestureRecognizer>> _gSet = Set()
    ..addAll([
      Factory<VerticalDragGestureRecognizer>(
              () => VerticalDragGestureRecognizer()),
      Factory<ScaleGestureRecognizer>(() => ScaleGestureRecognizer()),
      Factory<PanGestureRecognizer>(() => PanGestureRecognizer()),
    ]);
  void _checkInternet() {
    _connectivity = Connectivity();
    _subscription = _connectivity!.onConnectivityChanged.listen((result) {
      if (result == ConnectivityResult.wifi ||
          result == ConnectivityResult.mobile) {
        _isInternet = true;
      } else {
        _isInternet = false;
      }
      setState(() {});
    });
  }
  @override
  void initState() {
    super.initState();
    _checkInternet();
  }
  @override
  void dispose() {
    _subscription!.cancel();
    super.dispose();
  }
  Future<bool> _showDialog() async {
    return (await showDialog(
      context: context,
      builder: (context) {
        return AlertDialog(
          title: Text('Are You Sure?'),
          content: Text('Do you want to exit App'),
          actions: [
            FlatButton(
              onPressed: () => Navigator.of(context).pop(false),
              child: Text('No'),
            ),
            FlatButton(
              onPressed: () => exit(0),
              child: Text('Yes'),
            ),
          ],
        );
      },
    )) ??
        false;
  }
  Future<bool> _onBackPressed(context) async {
    try {
      if (_controller != null) {
        if (await _webViewController!.canGoBack()) {
          _webViewController!.goBack();
          return false;
        } else {
          return await _showDialog();
        }
      }
    } catch (e) {
      return await _showDialog();
    }
    return false;
  }
  @override
  Widget build(BuildContext context) {
    return WillPopScope(
      onWillPop: () async {
        return _onBackPressed(context);
      },
      child: Scaffold(
        body: SafeArea(
          child: _isInternet
              ? WebView(
            // userAgent:
            //     'Mozilla/5.0 (Linux; Android 6.0; Nexus 5 Build/MRA58N) AppleWebKit/537.36 (KHTML, like Gecko) Chrome/62.0.3202.94 Mobile Safari/537.36',
            initialUrl: _url,
            gestureRecognizers: _gSet,
            javascriptMode: JavascriptMode.unrestricted,
            onWebViewCreated: (controller) {
              _webViewController = controller;
              _controller.complete(controller);
            },
            gestureNavigationEnabled: true,
          )
              : Center(
            child: Column(
              mainAxisAlignment: MainAxisAlignment.center,
              children: [
                Icon(
                  Icons.warning_amber_sharp,
                  color: Colors.red,
                  size: 50.0,
                ),
                Text(
                  'No Internet Connection',
                  style: TextStyle(color: Colors.red, fontSize: 16.0),
                ),
              ],
            ),
          ),
        ),
        floatingActionButton: NavigationControls(_controller.future),
      ),
    );
  }
}
class HomePage extends StatefulWidget {
  @override
  _HomePageState createState() => _HomePageState();
}
class NavigationControls extends StatelessWidget {
  const NavigationControls(this._webViewControllerFuture)
      : assert(_webViewControllerFuture != null);
  final Future<WebViewController> _webViewControllerFuture;
  @override
  Widget build(BuildContext context) {
    return FutureBuilder<WebViewController>(
      future: _webViewControllerFuture,
      builder:
          (BuildContext context, AsyncSnapshot<WebViewController> snapshot) {
        final bool webViewReady =
            snapshot.connectionState == ConnectionState.done;
        final WebViewController controller = snapshot.data!;
        return FloatingActionButton(
          backgroundColor: Color(0xffFFAA02),
          child: const Icon(Icons.replay),
          onPressed: !webViewReady
              ? null
              : () {
            controller.reload();
          },
        );
      },
    );
  }
}
Results
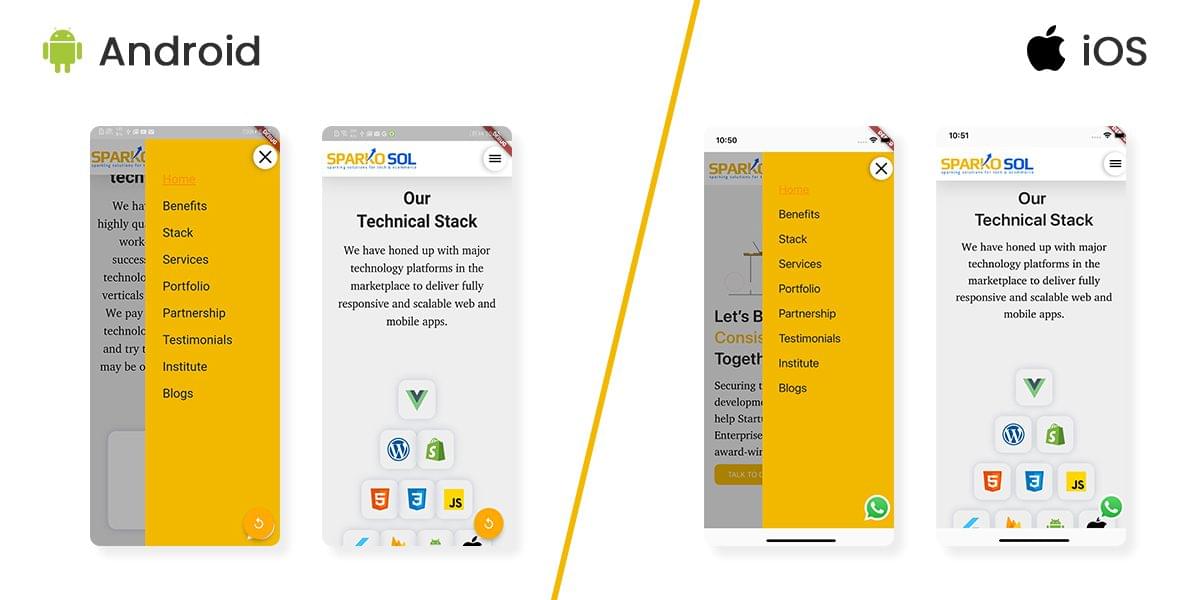
Webview in Flutter example
You might have seen some apps which require login with third-party apps. In those apps, an embedded webview layer appears when you click on the login button. That embedded layer allows you to access a specific URL and you surf through it. This is what you call webview in an app.
Another example of webview in an app is when you use third-party payment gateways to make online purchases. The screen that pops up on the app’s UI is an example of webview in Flutter.
Conclusion
This was pretty much it for a quick guide to adding a webview in Flutter apps. Surprisingly, you can also do some manipulation in the webview_flutter package. These manipulations could be the addition of zooming features, progress bars, etc.
No doubt, webview gives benefits by providing enhanced control over the app, there are fewer drawbacks as well. It doesn’t offer the full functionality of the web content that you embed on the app. A native interface has a definite control over all the components so it does its best when it comes to performance.
That’s all folks! We hope you will get a better idea of how to add webview in Flutter apps. If you still have any questions to ask, feel free to comment below. Our team of skilled flutter developers would love to assist you in every way possible.


